
Background
Oracle Integration provides native connectivity to Oracle and non-Oracle Software as a Service (SaaS) and On-premises applications, such as Oracle ERP Cloud, Oracle Service Cloud, Oracle HCM Cloud, Salesforce.com, Workday, EBS, SAP, NetSuite and so on. Oracle Integration adapters simplify best practice connectivity to these applications by handling many of the underlying technical complexities often encountererd when integrating applications.
Use Case
This use case explores the use of Oracle Integration to extract data from Oracle Business Intelligence Publisher (BIP). This use case includes the following steps:
- Get the most recent list of approved invoices.
- Extract the most recent payment data and update other applications to reflect new payments.
- Deliver the report to UCM or SFTP or trigger a report using ERP integration service.
The data file can be larger than 10MB. Oracle Integration supports handling large files as an attachment (instead of base64 encoding). We recommend that you use CSV format to reduce the size of the file.
See this blog article to learn how to handle files from various interfaces and file size constraints.
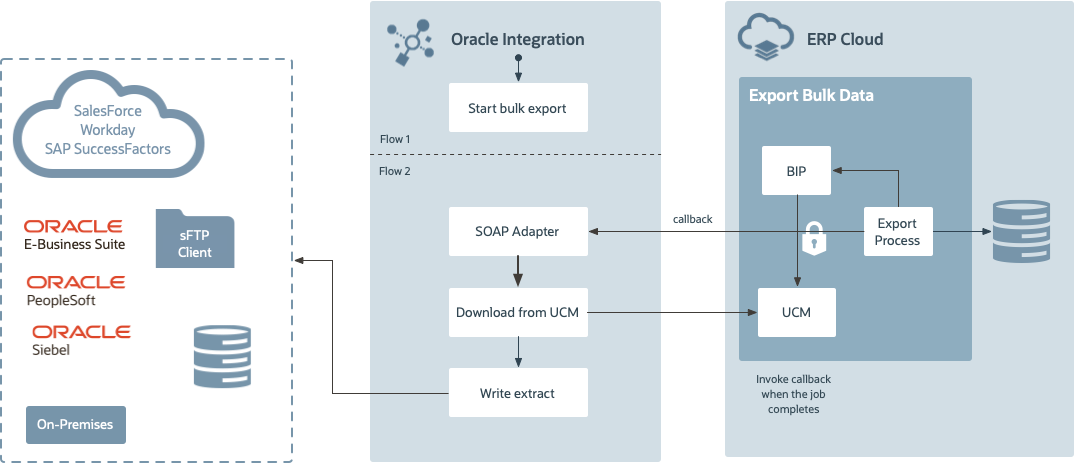
The following diagram shows the interaction between the systems involved in this use case.
Before You Begin
Some steps in this tutorial have a  icon next to them. Click this
icon to copy the snippet of text to your clipboard and then paste where needed.
icon next to them. Click this
icon to copy the snippet of text to your clipboard and then paste where needed.
Your instructor will provide you the information you need to access the environments used in this lab.
For this lab we will provide you the following:
- Oracle Integration
- ERP Cloud
- FTP Server
For this lab you will need the following:
- FTP Client
Get Your Oracle Integration (OIC) Environment
Select your OIC Environment and enter your User Number to get the information needed to access Oracle Integration.
- OIC URL:
- OIC User Name:
- OIC Password: Your password will be provided by the instructor.
Get Your ERP Cloud Environment
Select your ERP Cloud Payables environment to get the information needed to access Oracle ERP Cloud.
- ERP Cloud URL:
-
ERP Cloud User Name:
- ERP Cloud Password: Your password will be provided by the instructor.
Get Your FTP Environment
Select your FTP Environment to get the information to access the FTP server:
-
FTP Server:
-
FTP Port:
-
Protocol:
-
FTP User Name:
- FTP Password: Your password will be provided by the instructor.
Sign In
-
Open your Oracle Integration instance.
Enter your user name and password.
Your password will be provided by the instructor.Click Sign In.
The Home page appears.
You are now logged in and ready to use Oracle Integration.
Create the ERP Bulk Extract Integration
- On the Home page, click Integrations, and then click Integrations.
- On the Integrations page, click Create.
- In the Select Integration Style dialog, select Scheduled Orchestration.
- Click Select.
- In the Create New Integration dialog, configure the integration:
What do you want to call your integration?
Enter
ERP Bulk Extract-
In the What does this integration do? field, enter:
This integration starts the extraction of payable transactions in the ERP Cloud.
- Click Create.
Create the Initiate Extract Activity
- Hover over the outgoing arrow for the Schedule activity and click
 .
.
- In the Search field, begin typing
ERP Cloudto find your connection. -
Select the connection named
ERP Cloud.The Configure Oracle ERP Cloud Endpoint wizard appears.
- Name your endpoint
InitiateExtract. - In the What does this endpoint do? field, enter
This endpoint starts the extraction of payable transactions. - Click Next.
- On the Actions page, select the Query, Create, Update or Delete Information option.
- Click Next.
- On the Operations page, from the Browse by list, select Services.
- In the Select a Service field, enter
ERPIntegrationServiceand select it from the list. - From the Operation to perform on the Business Object/Resource or Service list, select Export Bulk Data.
-
Click Next.
A summary of the properties you configured appears.
- Review the summary and click Done.
-
On the Integration canvas, from the Layout list, select Horizontal.

- Click Save to save the integration.
Define the Data Mapping
A Map action named Map to InitiateExtract is automatically created. We'll define this data mapping.
- Select the Map to InitiateExtract action.
Click
 .
.The Data Mapping page appears.
Note: Ignore the suggestion for recommended mappings.
- In the Target section, expand the InitiateExtract Request element.
-
In cases where you are not mapping from source to target, for example when the target requires a literal value or expression, you need to manually create the target node:
- Right-mouse click on the desired node and select Create Target Node.
-
Click
 in the Expression editor to enable edit mode.
Enter the desired literal value or expression in the Expression editor at the bottom of the page.
Note: Literal values need to be enclosed in " "
The literal values include in this lab guide are already enclosed in " ", so please do not add additional quotes.
-
Click
 in the Expression editor to commit the data.
Verify a graphic is added to the mapping canvas indicating your target node has the literal or expression correctly mapped.
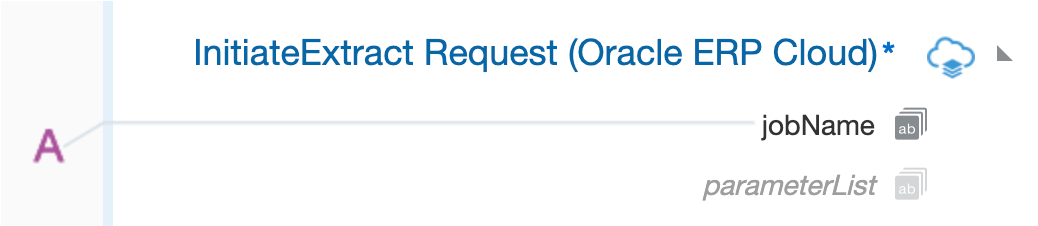
Map the fields under the InitiateExtract Request element to the following literal values:
- jobName:
"oracle/apps/ess/financials/commonModules/shared/common/outbound,FinOutboundProcess" - parameterList:
"92,/oracle/apps/ess/financials/commonModules/shared/common/outbound;PayablesTransactionsExtract,BIPREPORT,FULL_EXTRACT,#NULL,300000046987012,#NULL,#NULL,#NULL,#NULL,#NULL,12-19,N,N,300000046975971,#NULL,#NULL,#NULL,FULL_EXTRACT,#NULL,#NULL,#NULL,PayablesTransactionsExtract,#NULL" - jobOptions:
"ExtractFileType=ALL" - callbackURL: skip this mapping for now. We will assign a value after we design and activate the callback flow.
- notificationCode:
30
- jobName:
- Click Validate.
- Click Close.
- Click Save to save the integration.
Define the Tracking Fields
-
In the Integration canvas, you should see an error icon
 next to the Last Saved field.
The icon shows the number of errors you need to fix in your integration. You should have one error. To fix this error you need to add business tracking identifiers.
On the Integration canvas, click
 , and then select Tracking.
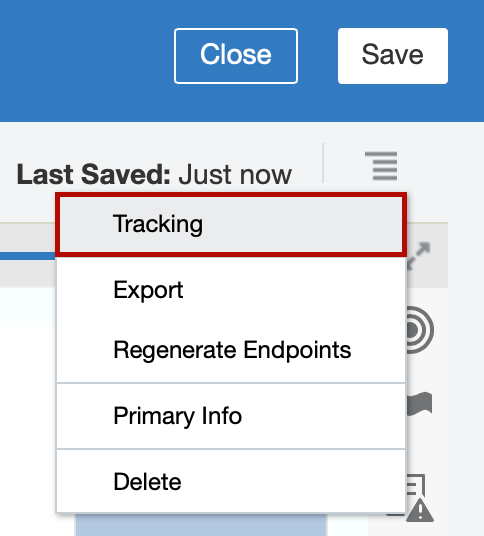
In the Business Identifiers for Tracking dialog, from the Source section, select StartTime, and then click
 .
.The selected field appears in the Tracking Fields table. The StartTime field is marked as Primary.
-
Click Save.
Notice there are no errors.
- On the Integration canvas, click Save, and then click Close.
Create the ERP Bulk Extract Callback Integration
- On the Integrations page, click Create.
- In the Select an Integration Style dialog, select App Driven Orchestration.
- Click Select.
- In the Create New Integration dialog, configure the integration:
What do you want to call your integration?
Enter
ERP Bulk Extract Callback-
In the What does this integration do? field, enter:
This integration is triggered when it receives a callback from the ERP Bulk Extract integration. When it receives the callback, it downloads the extract, and uploads it to an FTP server.
- Click Create.
Create the ERP Cloud Callback Trigger
- Hover over START and click .
- Begin typing
ERP Cloud Callbackin the Search field to find the connection to your ERP Cloud Callback. -
Select the connection named
ERP Cloud Callback.The Configure SOAP Endpoint wizard appears.
- Name your endpoint
BulkExtractCallback. -
In the What does this endpoint do? field, enter:
This endpoint defines an ERP Cloud callback. - Click Next.
- On the Operations page, from the Disable SOAP Action Validation options, select No.
- Click Next.
- On the Callback Operation page, from the type of response expected options, select No Response.
- Click Next.
- On the Headers page, from the Do you want to configure headers for this endpoint? options, select No.
-
Click Next.
A summary of the properties you configured appears.
- Review the summary and click Done.
-
On the Integration canvas, from the Layout list, select Horizontal.
- Click Save to save the integration.
Create the Download Activity
- Hover over the outgoing arrow for the BulkExtractCallback activity and click
.
- In the Search field, begin typing
ERP Cloud Integration Serviceto find your connection. -
Select the connection named
ERP Cloud Integration Service.The Configure SOAP Endpoint wizard appears.
- Name your endpoint
DownloadFile. - Click Next.
-
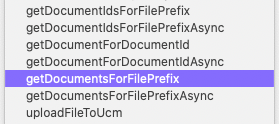
On the Operations page, from the Operation list, select getDocumentsForFilePrefix.
Be careful to select the correct operation as many of them have similiar names.
- Click Next.
On the Headers page, select Accept attachments in response.
Note: The SOAP adapter allows rich capability to accept content as an attachment, instead of base64-encoded data.
If you don't see this option, it is likely you selected the wrong operation. Click
Back and verify you have the correct operation.-
Click Next.
A summary of the properties you configured appears.
- Review the summary and click Done.
- Click Save to save the integration.
Define the Data Mapping
A Map action named Map to DownloadFile is automatically created. We'll define this data mapping.
- Select the Map to DownloadFile action.
Click
.The Data Mapping page appears.
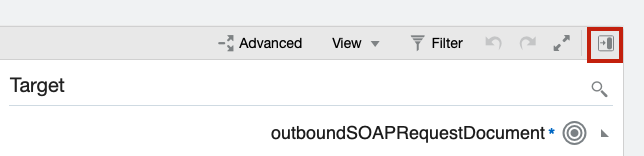
- In the Target section, expand the OutboundSOAPRequestDocument, Body, then getDocumentsForFilePrefix elements.
Click the Toggle Functions button located in the Target section toolbar.
- In the Component palette, expand the String node.
- Drag the concat function and drop it on prefix element in the Target section.
In the Expression window, edit the
concatfunction to use the following parameters:"ESS_"//requestId"_BIPReport0"
The complete expression should read:
concat ( "ESS_", //requestId, "_BIPReport0" )-
Click
in the Expression editor to commit the expression. -
Map the account element to the following expression:
"fin$/payables$/export$"-
Right-mouse click on the account node and select Create Target Node.
-
Click
in the Expression editor to enable edit mode. Enter the literal value.
Click
in the Expression editor to commit the data.
-
- In the same way. map the comments element to the following expression:
concat ( "processedby=", //requestId ) - Click Validate.
- Click Close.
- Click Save to save the integration.
Create the Write Extract Activity
- Hover over the outgoing arrow for the DownloadFile activity and click
.
- In the Search field, begin typing
FTP File Serverto find your connection. -
Select the connection named
FTP File Server.The Configure Oracle Adapter Endpoint Configuration Wizard appears.
- Name your endpoint
WriteExtract. - Click Next.
On the Operations page, configure the following properties:
- From the Select Operation list, select Write File.
-
In the Output Directory field, enter
/upload/public_ftp/ - In the File Name Pattern field, enter
PayablesExtract.xml
- Click Next.
On the Schema page, from the Specify the structure for the contents of the file options, select No.
For the purpose of this lab we will write the complete extract.
-
Click Next.
A summary of the properties you configured appears.
- Review the summary and click Done.
- Click Save to save the integration.
Define the Data Mapping
A Map action named Map to WriteExtract is automatically created. We'll define this data mapping.
- Select the Map to WriteExtract action.
Click
.The Data Mapping page appears.
- In the Source section, expand $DownloadFile, then expand the getDocumentsForFilePrefixResponse, and then expand result.
- In the Target section, expand ICSFile.
- Map the Content element in the Source section to the FileReference element in the Target section.
- Click Validate.
- Click Close.
- Click Save to save the integration.
Define the Tracking Fields
-
In the Integration canvas, you should see an error icon
next to the Last Saved field.
The icon shows the number of errors you need to fix in your integration. You should have one error. To fix this error you need to add business tracking identifiers.
On the Integration canvas, click
, and then select Tracking.In the Business Identifiers for Tracking dialog, from the Source section, select requestId, and then click
.The selected field appears in the Tracking Fields table. The requestId field is marked as Primary.
-
Click Save.
Notice there are no errors.
- On the Integration canvas, click Save, and then click Close.
Activate the ERP Bulk Extract Callback Integration
-
On the Integrations page, locate your integration and hover over it.
The name of your integration is
ERP Bulk Extract Callback.When you hover over the integration, a set of actions appear in the Status column.

- Click
 .
. -
Select Enable Tracing, and then select Include Payload.
Typically these options are disabled in production environments, but we'll enable them for the purpose of this lab.
-
Click Activate.
The activation will complete in a few seconds. If the activation succeeds, a confirmation message appears at the top of the page, and the status will change to ● Active.
-
On the Integrations page, locate your integration and hover over it.
The name of your integration is
ERP Bulk Extract Callback.When you hover over the integration, a set of actions appear in the Status column.

- Click
 .
. - Copy the link in the WSDL URL without the
?wsdlat the end.
Map the Callback URL
On the Integrations page, locate your ERP Bulk Extract integration and open it.
The name of your integration is
ERP Bulk Extract.- Select the Map to InitiateExtract action.
Click
.The Data Mapping page appears.
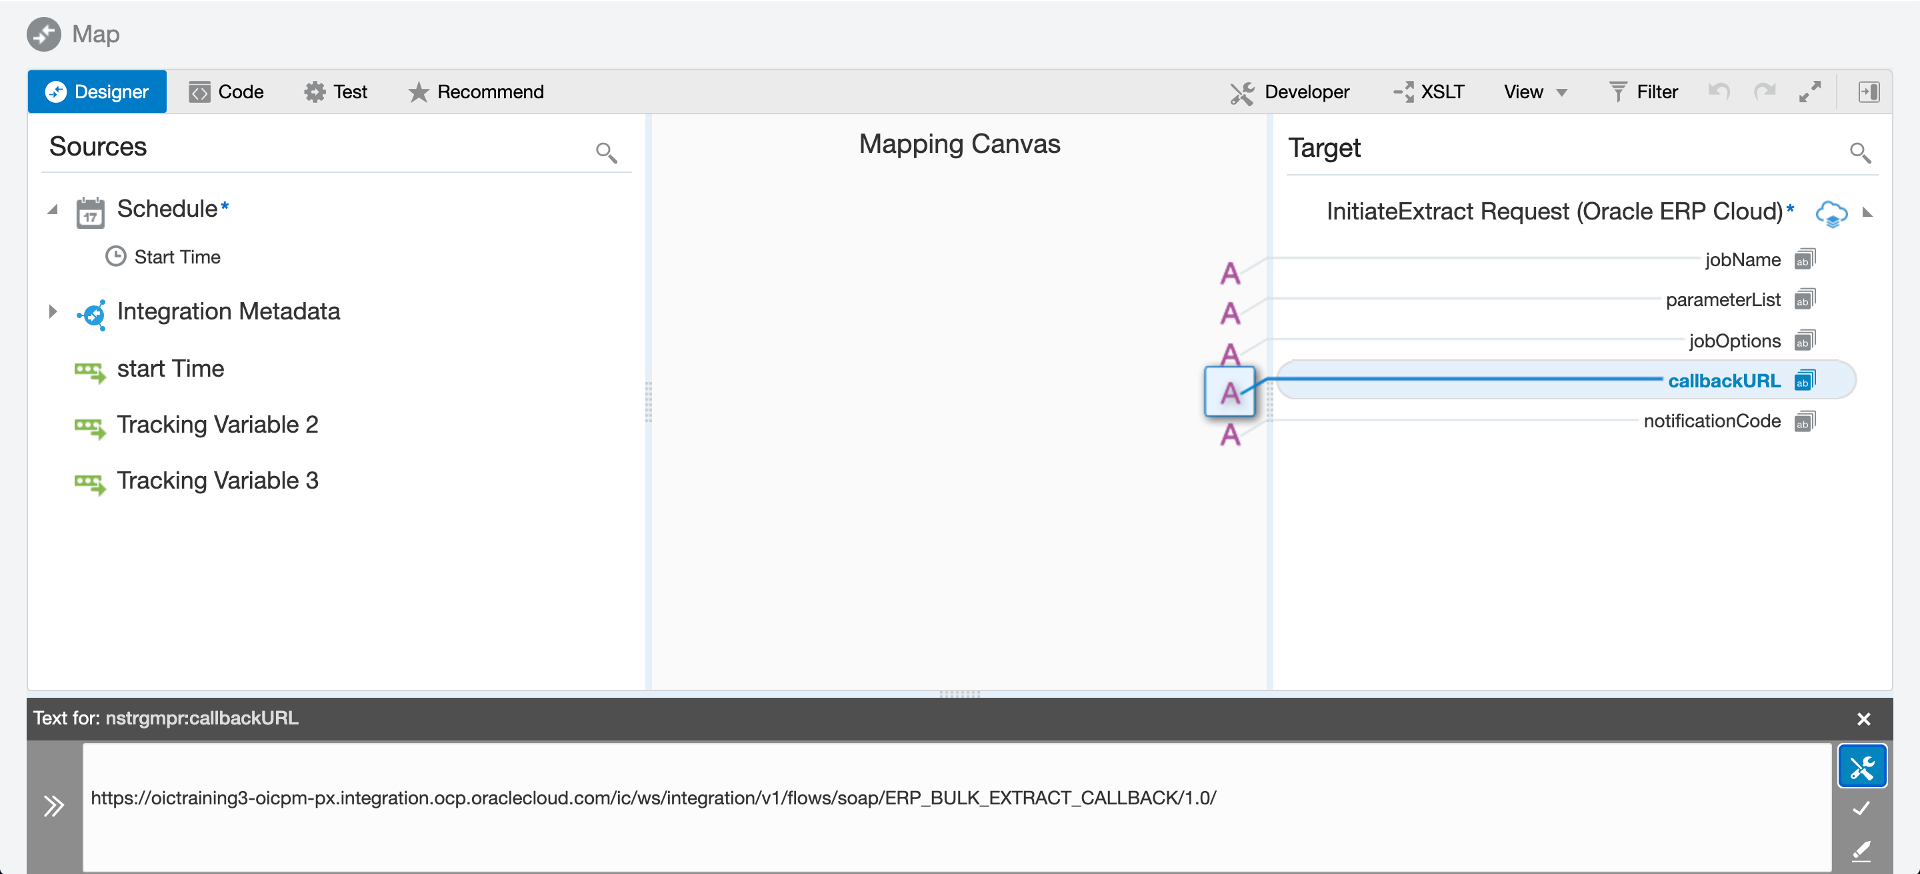
- In the Target section, right-mouse click on the callbackURL node and select Create Target Node.
Click
in the Expression editor to enable edit mode.- In the Expression window, paste the WSDL, enclosed in quotes, that you copied from the activated callback integration.
Click
in the Expression editor to commit the expression.Your mapping should look similiar to this.
- Click Validate.
- Click Close.
- Click Save to save the integration.
Activate the ERP Bulk Extract Integration
-
On the Integrations page, locate your integration and hover over it.
The name of your integration is
ERP Bulk Extract.When you hover over the integration, a set of actions appear in the Status column.
- Click .
-
Select Enable Tracing, and then select Include Payload.
Typically these options are disabled in production environments, but we'll enable them for the purpose of this lab.
-
Click Activate.
The activation will complete in a few seconds. If the activation succeeds, a confirmation message appears at the top of the page, and the status will change to ● Active.
Run the ERP Bulk Extract Integration
-
On the Integrations page, locate your integration and hover over it.
The name of your integration is
ERP Bulk Extract.When you hover over the integration, a set of actions appear in the Status column.

- Click
 .
. Click Submit Now, and then Submit Now again.
A confirmation message with a link to track instance appears.
Click Integrations in the top level navigation pane to return to Home.
- From Home, click Monitoring, then Integrations, then Tracking.
Find your the integration instance with your integration name and click on the startTime link top open the integration instance flow.
Confirm the flow was successfully completed.
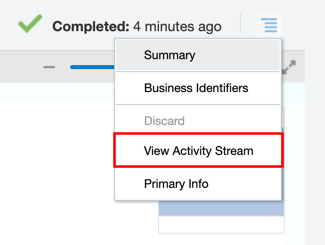
-
Click
 and select View Activity Stream.
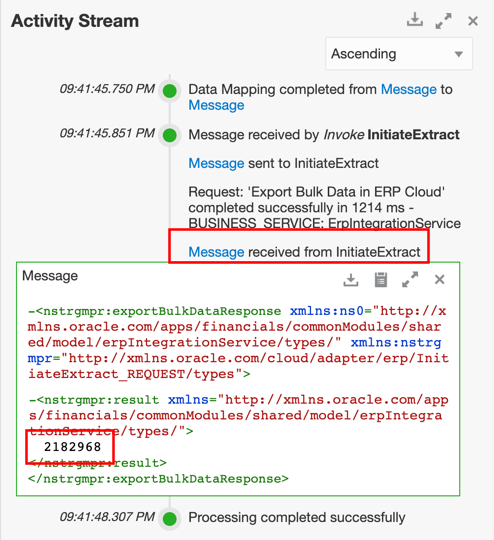
-
Click on the last Message link in the Activity Stream labeled received from InitiateExtract and copy the Process Id returned in the result data element.
Verify
Log in to the ERP Cloud:
- ERP Cloud URL:
-
ERP Cloud User Name:
- ERP Cloud Password: Your password will be provided by the instructor.
- Select the Tools tab.
- Click Scheduled Processes.
-
Expand Search and search for the Process Id returned from your integration.
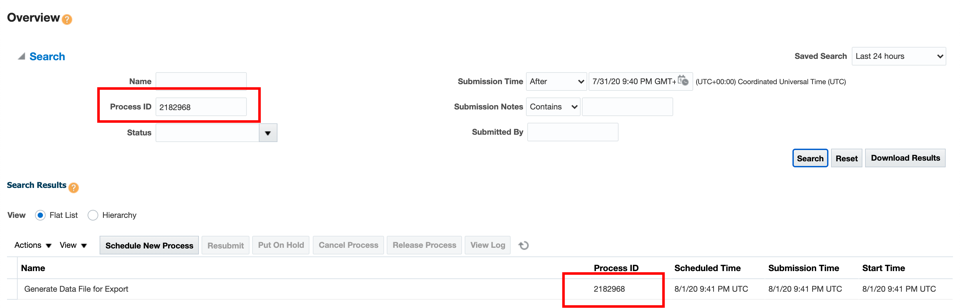
-
Click the process to open and verify that the Payables transaction job completed successfully.

Using an FTP Client of your choice, log in to the FTP server.
-
FTP Server:
-
FTP Port:
-
Protocol:
-
FTP User Name:
- FTP Password: Your password will be provided by the instructor.
-
FTP Server:
-
Open the following FTP directory and verify the PayablesExtract.xml file exists.
/upload/public_ftp/ - Download the PayablesExtract.xml file and review.
Congratulations!
Congratulations! You have finished your integration flow.
