
Background
Oracle Integration provides native connectivity to Oracle and non-Oracle Software as a Service (SaaS) and On-premises applications, such as Oracle ERP Cloud, Oracle Service Cloud, Oracle HCM Cloud, Salesforce.com, Workday, EBS, SAP, NetSuite and so on. Oracle Integration adapters simplify best practice connectivity to these applications by handling many of the underlying technical complexities often encountererd when integrating applications.
Use Case
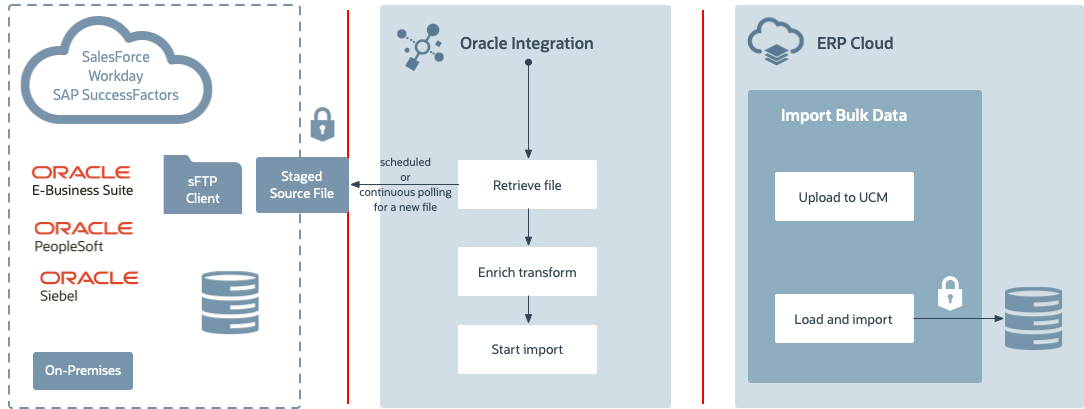
This use case uses Oracle Integration (OIC) and ERP Cloud Import Bulk Data services with File-based Data Integration (FBDI) compliant files. The goal is to import ERP data such as account payable invoices using processes in ERP Cloud.
The typical flow for this use case is:
- The user uploads an FBDI-based account payable invoice file to an FTP server.
- Oracle Integration imports the account payable invoice file to the ERP Cloud.
This lab will explore the ERP adapter and Visual Builder Cloud Service features, and show you how to perform the following tasks:
- Read files from an sFTP server.
- Synchronize account payable invoices to the ERP Cloud.
The following diagram shows the interaction between the systems involved in this use case:
Before You Begin
Some steps in this tutorial have a  icon next to them. Click this
icon to copy the snippet of text to your clipboard and then paste where needed.
icon next to them. Click this
icon to copy the snippet of text to your clipboard and then paste where needed.
Your instructor will provide you the information you need to access the environments used in this lab.
For this lab we will provide you the following:
- Oracle Integration
- ERP Cloud
- FTP server
- Template to generate an ERP Cloud FBDI import file
For this lab you will need the following:
- FTP Client
Get Your Oracle Integration (OIC) Environment
Select your OIC Environment and enter your User Number to get the information needed to access Oracle Integration.
- OIC URL:
- OIC User Name:
- OIC Password: Your password will be provided by the instructor.
Get Your ERP Cloud Environment
Select your ERP Cloud Payables environment to get the information needed to access Oracle ERP Cloud.
- ERP Cloud URL:
-
ERP Cloud User Name:
- ERP Cloud Password: Your password will be provided by the instructor.
Get Your FTP Environment
Select your FTP Environment to get the information to access the FTP server:
-
FTP Server:
-
FTP Port:
-
Protocol:
-
FTP User Name:
- FTP Password: Your password will be provided by the instructor.
Create the FBDI File
Download the Invoice Import Template spreadsheet.
GSEPayablesStandardInvoiceImportTemplate.xlsmDownload the APTEST.PROPERTIES file.
APTEST.PROPERTIES-
Open the GSEPayablesStandardInvoiceImportTemplate.xlsm spreadsheet.
This spreadsheet contains macros and you might get a security warning. Select the option to enable the content.
Open the AP_INVOICES_INTERFACE sheet and update the following fields with unique random numbers:
- Invoice ID
- Invoice Number
For example, you can use your user number concatenated with the current date.
Enter the data in each cell, don't copy paste. This is to preserve the data type of each column. If you change the data type, this lab will fail.
Save the file.
You might get a warning message about the macros used in this spreadsheet. Accept the message.
- Open the AP_INVOICE_LINE_INTERFACE sheet.
- Enter the same invoice IDs that you used in the AP_INVOICES_INTERFACE sheet.
- Save the file.
- Open the Instructions and CSV Generation sheet.
Click Generate CSV file
A file browser dialog appears.
- Name the zip file:
apinvoiceimport.zip. - Save the AP_INVOICES_INTERFACE file as
ApInvoiceInterface.csv. - Save the AP_INVOICES_LINES_INTERFACE file as
ApInvoiceLinesInterface.csv. - You can close the GSEPayablesStandardInvoiceImportTemplate.xlsm spreadsheet
From File Explorer, copy the
APTEST.PROPERTIESfile to theapinvoiceimport.zipzip file.The zip file should contain three files:
ApInvoiceInterface.csv,ApInvoiceLinesInterface.csv, andAPTEST.PROPERTIES.Note: Failing to copy the
APTEST.PROPERTIESfile will prevent the import payables job from running.
Note: For the purpose of this lab we won't change the values for the Business Unit, Supplier Name, Supplier Number, and Supplier Site fields in the AP_INVOICES_INTERFACE sheet. If you want to change them in the future, make sure that the values you provide match the values in the ERP instance. If you change the business unit or the source, you must also update the properties file.
Upload the FBDI File to the FTP File Server
Using an FTP Client of your choice, log in to the FTP server.
-
FTP Server:
-
FTP Port:
-
Protocol:
-
FTP User Name:
- FTP Password: Your password will be provided by the instructor.
-
FTP Server:
-
Copy the
apinvoiceimport.zipfile to the following FTP directory:/upload/public_ftp/
Note: For the purpose of this lab we won't change the values for the Business Unit, Supplier Name, Supplier Number, and Supplier Site fields in the AP_INVOICES_INTERFACE sheet. If you want to change them in the future, make sure that the values you provide match the values in the ERP instance. If you change the business unit or the source, you must also update the properties file.
Sign In
-
Open your Oracle Integration instance.
Enter your user name and password.
Your password will be provided by the instructor.Click Sign In.
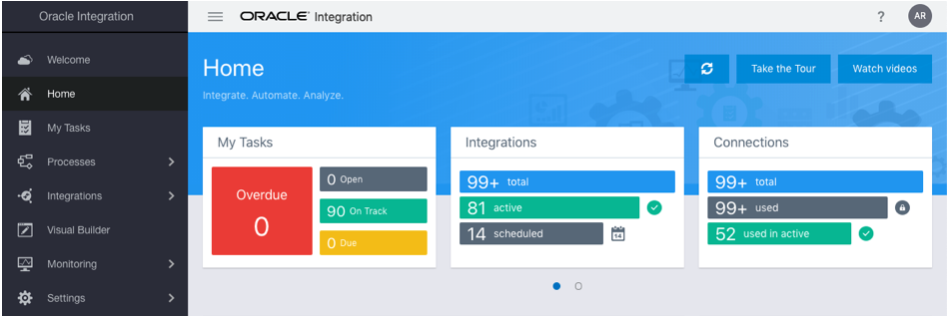
The Home page appears.
You are now logged in and ready to use Oracle Integration.
Create the Invoice Bulk Import to ERP Integration
- On the Home page, click Integrations, and then click Integrations.
- On the Integrations page, click Create.
- In the Select Integration Style dialog, select Scheduled Orchestration.
- Click Select.
- In the Create New Integration dialog, configure the integration:
What do you want to call your integration?
Enter
Invoice Bulk Import to ERP-
In the What does this integration do? field, enter:
This integration demonstrates the use of OIC’s ERP Cloud Adapter with the FTP adapter to retrieve an AP Invoices file, import it to the ERP Cloud, and receive a call back from the ERP Cloud.
- Click Create.
Get the File from an FTP server
- Hover over the outgoing arrow for Schedule and click
 .
.
- Select the FTP File Server.
- In the Oracle Adapter Endpoint Configuration Wizard name your endpoint
ReadAPInvoicesFileFromFTP. In the What does this endpoint do? field, enter:
Retrieves the AP Invoices that comply with FBDI from an FTP location.- Click Next.
- From the Operation list, select Read a File.
- From the Transfer Mode options, select ASCII.
Enter the following values
-
In the Input Directory field, enter
/upload/public_ftp/ - File Name:
apinvoiceimport.zip
-
In the Input Directory field, enter
- Click Next.
- On the Schema page, in the Do you want to specify the structure for the contents of the file section, select No.
-
Click Next.
A summary of the properties you configured appears.
- Review the summary and click Done.
-
On the Integration canvas, from the Layout list, select Horizontal.

We will not be using the ReadAPInvoicesFileFromFTP map activity. You can either leave it or delete it.
- Click Save.
Upload the File to ERP Cloud
- Hover over the outgoing arrow for ReadAPInvoicesFileFromFTP and click .
- Begin typing
ERP Cloudin the Search field to find the connection to your ERP Cloud. Select the connection named
ERP Cloud.The Configure Oracle ERP Cloud Endpoint wizard appears.
- Name your action:
ImportAPInvoicestoERPCloud. In the What does this endpoint do? field, enter:
Uploads files to UCM in ERP Cloud.- Click Next.
- On the Actions page, select Import Bulk Data into Oracle ERP Cloud.
- Click Next.
- On the Operations page, select Import Payables Invoices.
- Click Next.
On the Response page, select the following options:
- From the Notification Mode list, select Email & Bell Notification.
- From the Occurrence list, select Send in any case.
This configures how the ERP console shows the status of the process. For your convenience, you can configure these values from the adapter without having to open the ERP Console.
-
Click Next.
A summary of the properties you configured appears.
- Review the summary and click Done.
- Click Save to save the integration.
Define the Data Mapping
A Map action named Map to ImportAPInvoicestoERPCloud is automatically created. We'll define this data mapping.
- Click the action Map to ImportAPInvoicestoERPCloud and click
 .
.
In the Sources section successively expand the following elements:
- $ReadAPInvoicesFileFromFTP
- SyncReadFileResponse
- FileReadResponse
- ICSFile
In the Target section successively expand the following elements:
- importBulkData
- ICSFile
Drag the FileReference element in the Sources section, and drop it on the element of the same name in the Target section.
- In the Sources and Target sections expand Properties located under ICSFile.
Drag the following elements from the Sources and drop them on the element of the same name in the Target section:
- directory
- filename
Click Validate.
A confirmation message appears.
- Click Close.
- Click Save to save the integration.
Define the Tracking Fields
-
In the Integration canvas, you should see an error icon
 next to the Last Saved field.
The icon shows the number of errors you need to fix in your integration. You should have one error. To fix this error you need to add business tracking identifiers.
-
On the Integration canvas, click
 , and then select Tracking.
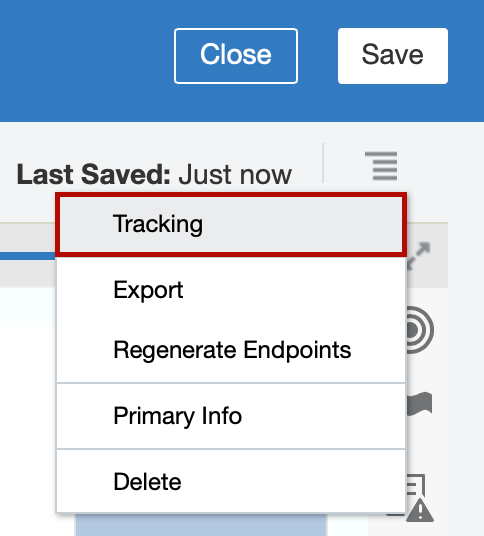
The Business Identifiers for Tracking dialog appears.
- In the Source section, expand the schedule element.
-
In the Source section, select startTime, and then click
 .
.The startTime field appears in the Tracking Fields table and is marked as Primary.
This defines how to identify your instances in the Monitoring console.
-
Click Save.
Notice there are no errors.
- On the Integration canvas, click Save, and then click Close.
Activate the Invoice Bulk Import to ERP Integration
-
On the Integrations page, locate your integration and hover over it.
The name of your integration is
Invoice Bulk Import to ERP.When you hover over the integration, a set of actions appear in the Status column.

- Click
 .
. -
Select Enable Tracing, and then select Include Payload.
Typically these options are disabled in production environments, but we'll enable them for the purpose of this lab.
-
Click Activate.
The activation will complete in a few seconds. If the activation succeeds, a confirmation message appears at the top of the page, and the status will change to ● Active.
Run the Integration
-
On the Integrations page, locate your integration and hover over it.
The name of your integration is
Invoice Bulk Import to ERP.When you hover over the integration, a set of actions appear in the Status column.

Click Run
 , then click Submit Now and then
 Submit Now again when prompted.A confirmation message with a link to track instance appears.
Click the link to track the instance.
The Track Instances page appears. The integration state should be Processing or Successful.
Importing of the invoices to the ERP Cloud might take a few minutes.
Verify the Bulk Import
Wait 5 minutes before performing this procedure.
Open a browser to sign in to the ERP Cloud using the following information:
- ERP Cloud URL:
-
ERP Cloud User Name:
- ERP Cloud Password: Your password will be provided by the instructor.
- Click Payables.
- Click Invoices.
- Click
 in
the Details panel located under the User menu.
in
the Details panel located under the User menu.
- Enter the invoice number and click Search.
The invoice should appear in the search results.
Congratulations!
Congratulations! You have finished your integration flow.
