
Background
Oracle Integration provides native connectivity to Oracle and non-Oracle Software as a Service (SaaS) and On-premises applications, such as Oracle ERP Cloud, Oracle Service Cloud, Oracle HCM Cloud, Salesforce.com, Workday, EBS, SAP, NetSuite and so on. Oracle Integration adapters simplify best practice connectivity to these applications by handling many of the underlying technical complexities often encountererd when integrating applications.
Use Case
You can use Oracle Integration (OIC) mapping to transform source data at runtime. If you combine this with native schema formatting for output file definition, you can produce output files in any desired format.
This lab uses Oracle Integration to automate the following tasks:
- Read a file that contains new hired employees from an external FTP server.
- Transform and format the data to generate an DAT file that can be used in HCM.
- Import the DAT file to HCM Cloud using the HCM Data Loader, to create pending workers.
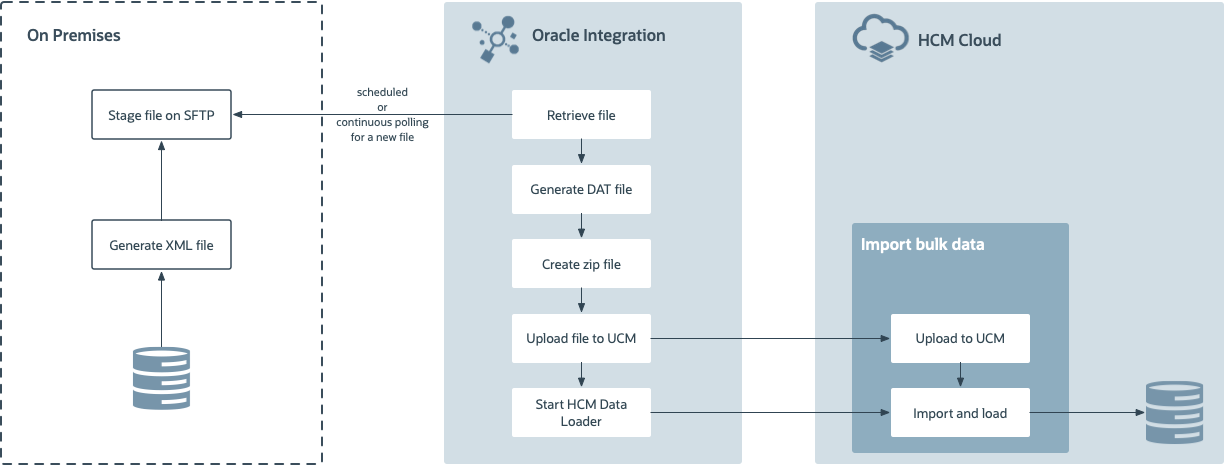
The following diagram shows the interaction between the systems involved in this use case:
Before You Begin
Some steps in this tutorial have a  icon next to them. Click this
icon to copy the snippet of text to your clipboard and then paste where needed.
icon next to them. Click this
icon to copy the snippet of text to your clipboard and then paste where needed.
Your instructor will provide you the information you need to access the environments used in this lab.
For this lab we will provide you the following:
- Oracle Integration
- HCM Cloud
- Postman
- FTP Server
Get Your Oracle Integration (OIC) Environment
Select your OIC Environment and enter your User Number to get the information needed to access Oracle Integration.
- OIC URL:
- OIC User Name:
- OIC Password: Your password will be provided by the instructor.
Get Your HCM Cloud Environment
Select your HCM Cloud Payables environment to get the information needed to access Oracle HCM Cloud.
- HCM Cloud URL:
-
HCM Cloud User Name:
- HCM Cloud Password: Your password will be provided by the instructor.
Get Your FTP Environment
Select your FTP Environment to get the information to access the FTP server:
-
FTP Server:
-
FTP Port:
-
Protocol:
-
FTP User Name:
- FTP Password: Your password will be provided by the instructor.
Sign In
-
Open your Oracle Integration instance.
Enter your user name and password.
Your password will be provided by the instructor.Click Sign In.
The Home page appears.
You are now logged in and ready to use Oracle Integration.
Clone the Integration Using REST
Download the Postman collection.
OICRestLab.postman_collection- Open Postman.
- Make sure the sidebar is visible.
Import the file you just downloaded.
The Collections tab in the side bar shows a new node called OICRestLab with the operations clone and activate.
- Select the clone operation.
Edit the post URL and replace <oic_host> with:
-
Configure the authorization to use Basic Auth and your Oracle Integration credentials.
Your password will be provided by the instructor. -
Edit the body of the request and replace
<StudentID>withThe resulting body is:
{ "code":"IMPORT_PENDING_WORKER_", "version":"01.00.0000", "name":"Import Pending Worker ", "description":"Pending worker import " } Send the request.
The response status should be
204.- Open Oracle Integration.
In the Navigation Menu, click Integrations, and then click Integrations.
Notice that the cloned integration with you Usere Number appears in the Integrations list.

Understand HCM Data Loader DAT Files
Use the NXSD native schema to generate a DAT file compatible with the HCM Data Loader in an integration.
The NXSD schema defines the structure of the output file (fields) and the formatting of the data.
- Download the worker-hdl-lab-exercise.nxsd file.
- Open the file in a text editor.
Locate the
schemaelement at the beginning of the file.This element defines the global schema attributes. You must include a similar
schemaelement in the NXSD schemas you build for HDL objects. You will need to change the object names.<schema xmlns="http://www.w3.org/2001/XMLSchema" xmlns:nxsd="http://xmlns.oracle.com/pcbpel/nxsd" xmlns:tns="http://supoc.oracle.com/WorkerData" targetNamespace="http://supoc.oracle.com/WorkerData" elementFormDefault="qualified" attributeFormDefault="unqualified" nxsd:stream="chars" nxsd:version="NXSD" nxsd:encoding="UTF8" nxsd:encodeLineTerminators="false" >Locate the
WorkerDataelement.This element defines the set of objects and child objects required to load this business object to the HCM Data Loader.
The following elements are specified for each of the objects in the NXSD schema:
ObjectLabelelement: inserts aMETADATAline in theDATfile.
For example:WorkerLabelObjectelement: inserts aMERGEline in theDATfile.
For example:Worker
The format for the lines is specified in the
nxsd:startsWidthattribute with the valuesMETADATAfor the object label andMERGEfor the object.<element name="WorkerData"> <complexType> <choice maxOccurs="unbounded" minOccurs="0"> <element ref="tns:WorkerLabel" minOccurs="0" maxOccurs="unbounded" nxsd:startsWith="METADATA|Worker|" /> <element ref="tns:Worker" minOccurs="0" maxOccurs="unbounded" nxsd:startsWith="MERGE|Worker|" /> <element ref="tns:PersonLegislativeDataLabel" minOccurs="0" maxOccurs="unbounded" nxsd:startsWith="METADATA|PersonLegislativeData|" /> <element ref="tns:PersonLegislativeData" minOccurs="0" maxOccurs="unbounded" nxsd:startsWith="MERGE|PersonLegislativeData|" /> <element ref="tns:PersonNameLabel" minOccurs="0" maxOccurs="unbounded" nxsd:startsWith="METADATA|PersonName|" /> <element ref="tns:PersonName" minOccurs="0" maxOccurs="unbounded" nxsd:startsWith="MERGE|PersonName|" /> <element ref="tns:PersonEmailLabel" minOccurs="0" maxOccurs="unbounded" nxsd:startsWith="METADATA|PersonEmail|" /> <element ref="tns:PersonEmail" minOccurs="0" maxOccurs="unbounded" nxsd:startsWith="MERGE|PersonEmail|" /> <element ref="tns:PersonAddressLabel" minOccurs="0" maxOccurs="unbounded" nxsd:startsWith="METADATA|PersonAddress|" /> <element ref="tns:PersonAddress" minOccurs="0" maxOccurs="unbounded" nxsd:startsWith="MERGE|PersonAddress|" /> <element ref="tns:PersonPhoneLabel" minOccurs="0" maxOccurs="unbounded" nxsd:startsWith="METADATA|PersonPhone|" /> <element ref="tns:PersonPhone" minOccurs="0" maxOccurs="unbounded" nxsd:startsWith="MERGE|PersonPhone|" /> <element ref="tns:PersonNationalIdentifierLabel" minOccurs="0" maxOccurs="unbounded" nxsd:startsWith="METADATA|PersonNationalIdentifier|" /> <element ref="tns:PersonNationalIdentifier" minOccurs="0" maxOccurs="unbounded" nxsd:startsWith="MERGE|PersonNationalIdentifier|" /> <element ref="tns:WorkRelationshipLabel" minOccurs="0" maxOccurs="unbounded" nxsd:startsWith="METADATA|WorkRelationship|" /> <element ref="tns:WorkRelationship" minOccurs="0" maxOccurs="unbounded" nxsd:startsWith="MERGE|WorkRelationship|" /> <element ref="tns:WorkTermsLabel" minOccurs="0" maxOccurs="unbounded" nxsd:startsWith="METADATA|WorkTerms|" /> <element ref="tns:WorkTerms" minOccurs="0" maxOccurs="unbounded" nxsd:startsWith="MERGE|WorkTerms|" /> <element ref="tns:AssignmentLabel" minOccurs="0" maxOccurs="unbounded" nxsd:startsWith="METADATA|Assignment|" /> <element ref="tns:Assignment" minOccurs="0" maxOccurs="unbounded" nxsd:startsWith="MERGE|Assignment|" /> </choice> </complexType> </element>Find the
WokerLabelelement.This element adds the name of the fields to the
METADATAline. Each object requires its corresponding label element.<element name="WorkerLabel"> <complexType> <sequence> <element name="EffectiveStartDateLabel" type="string" nxsd:style="terminated" nxsd:terminatedBy="|" /> <element name="EffectiveEndDateLabel" type="string" nxsd:style="terminated" nxsd:terminatedBy="|" /> <element name="StartDateLabel" type="string" nxsd:style="terminated" nxsd:terminatedBy="|" /> <element name="CategoryCodeLabel" type="string" nxsd:style="terminated" nxsd:terminatedBy="|" /> <element name="ActionCodeLabel" type="string" nxsd:style="terminated" nxsd:terminatedBy="|" /> <element name="DateOfBirthLabel" type="string" nxsd:style="terminated" nxsd:terminatedBy="|" /> <element name="SourceSystemOwnerLabel" type="string" nxsd:style="terminated" nxsd:terminatedBy="|" /> <element name="SourceSystemIdLabel" type="string" nxsd:style="terminated" nxsd:terminatedBy="|" /> <element name="ApplicantNumberLabel" type="string" nxsd:style="terminated" nxsd:terminatedBy="${eol}" /> </sequence> </complexType> </element>Locate the
Workerelement.This element defines the fields required by the HCM Data Loader
Workerobject. The format is defined in thenxsd:terminatedByattribute which adds a separator at the end of each line.<element name="Worker"> <complexType> <sequence> <element name="EffectiveStartDate" type="string" nxsd:style="terminated" nxsd:terminatedBy="|" /> <element name="EffectiveEndDate" type="string" nxsd:style="terminated" nxsd:terminatedBy="|" /> <element name="StartDate" type="string" nxsd:style="terminated" nxsd:terminatedBy="|" /> <element name="CategoryCode" type="string" nxsd:style="terminated" nxsd:terminatedBy="|" /> <element name="ActionCode" type="string" nxsd:style="terminated" nxsd:terminatedBy="|" /> <element name="DateOfBirth" type="string" nxsd:style="terminated" nxsd:terminatedBy="|" /> <element name="SourceSystemOwner" type="string" nxsd:style="terminated" nxsd:terminatedBy="|" /> <element name="SourceSystemId" type="string" nxsd:style="terminated" nxsd:terminatedBy="|" /> <element name="ApplicantNumber" type="string" nxsd:style="terminated" nxsd:terminatedBy="${eol}" /> </sequence> </complexType> </element>Locate the
PersonNameelement.This element defines the fields required by HCM Data Loader
Personobject. The format is defined in thenxsd:terminatedByattribute which adds a separator at the end of each line.<element name="PersonName"> <complexType> <sequence> <element name="PersonIdSourceSystemId" type="string" nxsd:style="terminated" nxsd:terminatedBy="|" /> <element name="EffectiveStartDate" type="string" nxsd:style="terminated" nxsd:terminatedBy="|" /> <element name="EffectiveEndDate" type="string" nxsd:style="terminated" nxsd:terminatedBy="|" /> <element name="LegislationCode" type="string" nxsd:style="terminated" nxsd:terminatedBy="|" /> <element name="NameType" type="string" nxsd:style="terminated" nxsd:terminatedBy="|" /> <element name="FirstName" type="string" nxsd:style="terminated" nxsd:terminatedBy="|" /> <element name="MiddleNames" type="string" nxsd:style="terminated" nxsd:terminatedBy="|" /> <element name="LastName" type="string" nxsd:style="terminated" nxsd:terminatedBy="|" /> <element name="SourceSystemOwner" type="string" nxsd:style="terminated" nxsd:terminatedBy="|" /> <element name="SourceSystemId" type="string" nxsd:style="terminated" nxsd:terminatedBy="${eol}" /> </sequence> </complexType> </element>
Understand the Integration
Open Oracle Integration and click the integration named Import Pending Worker .
The following integration flow appears:
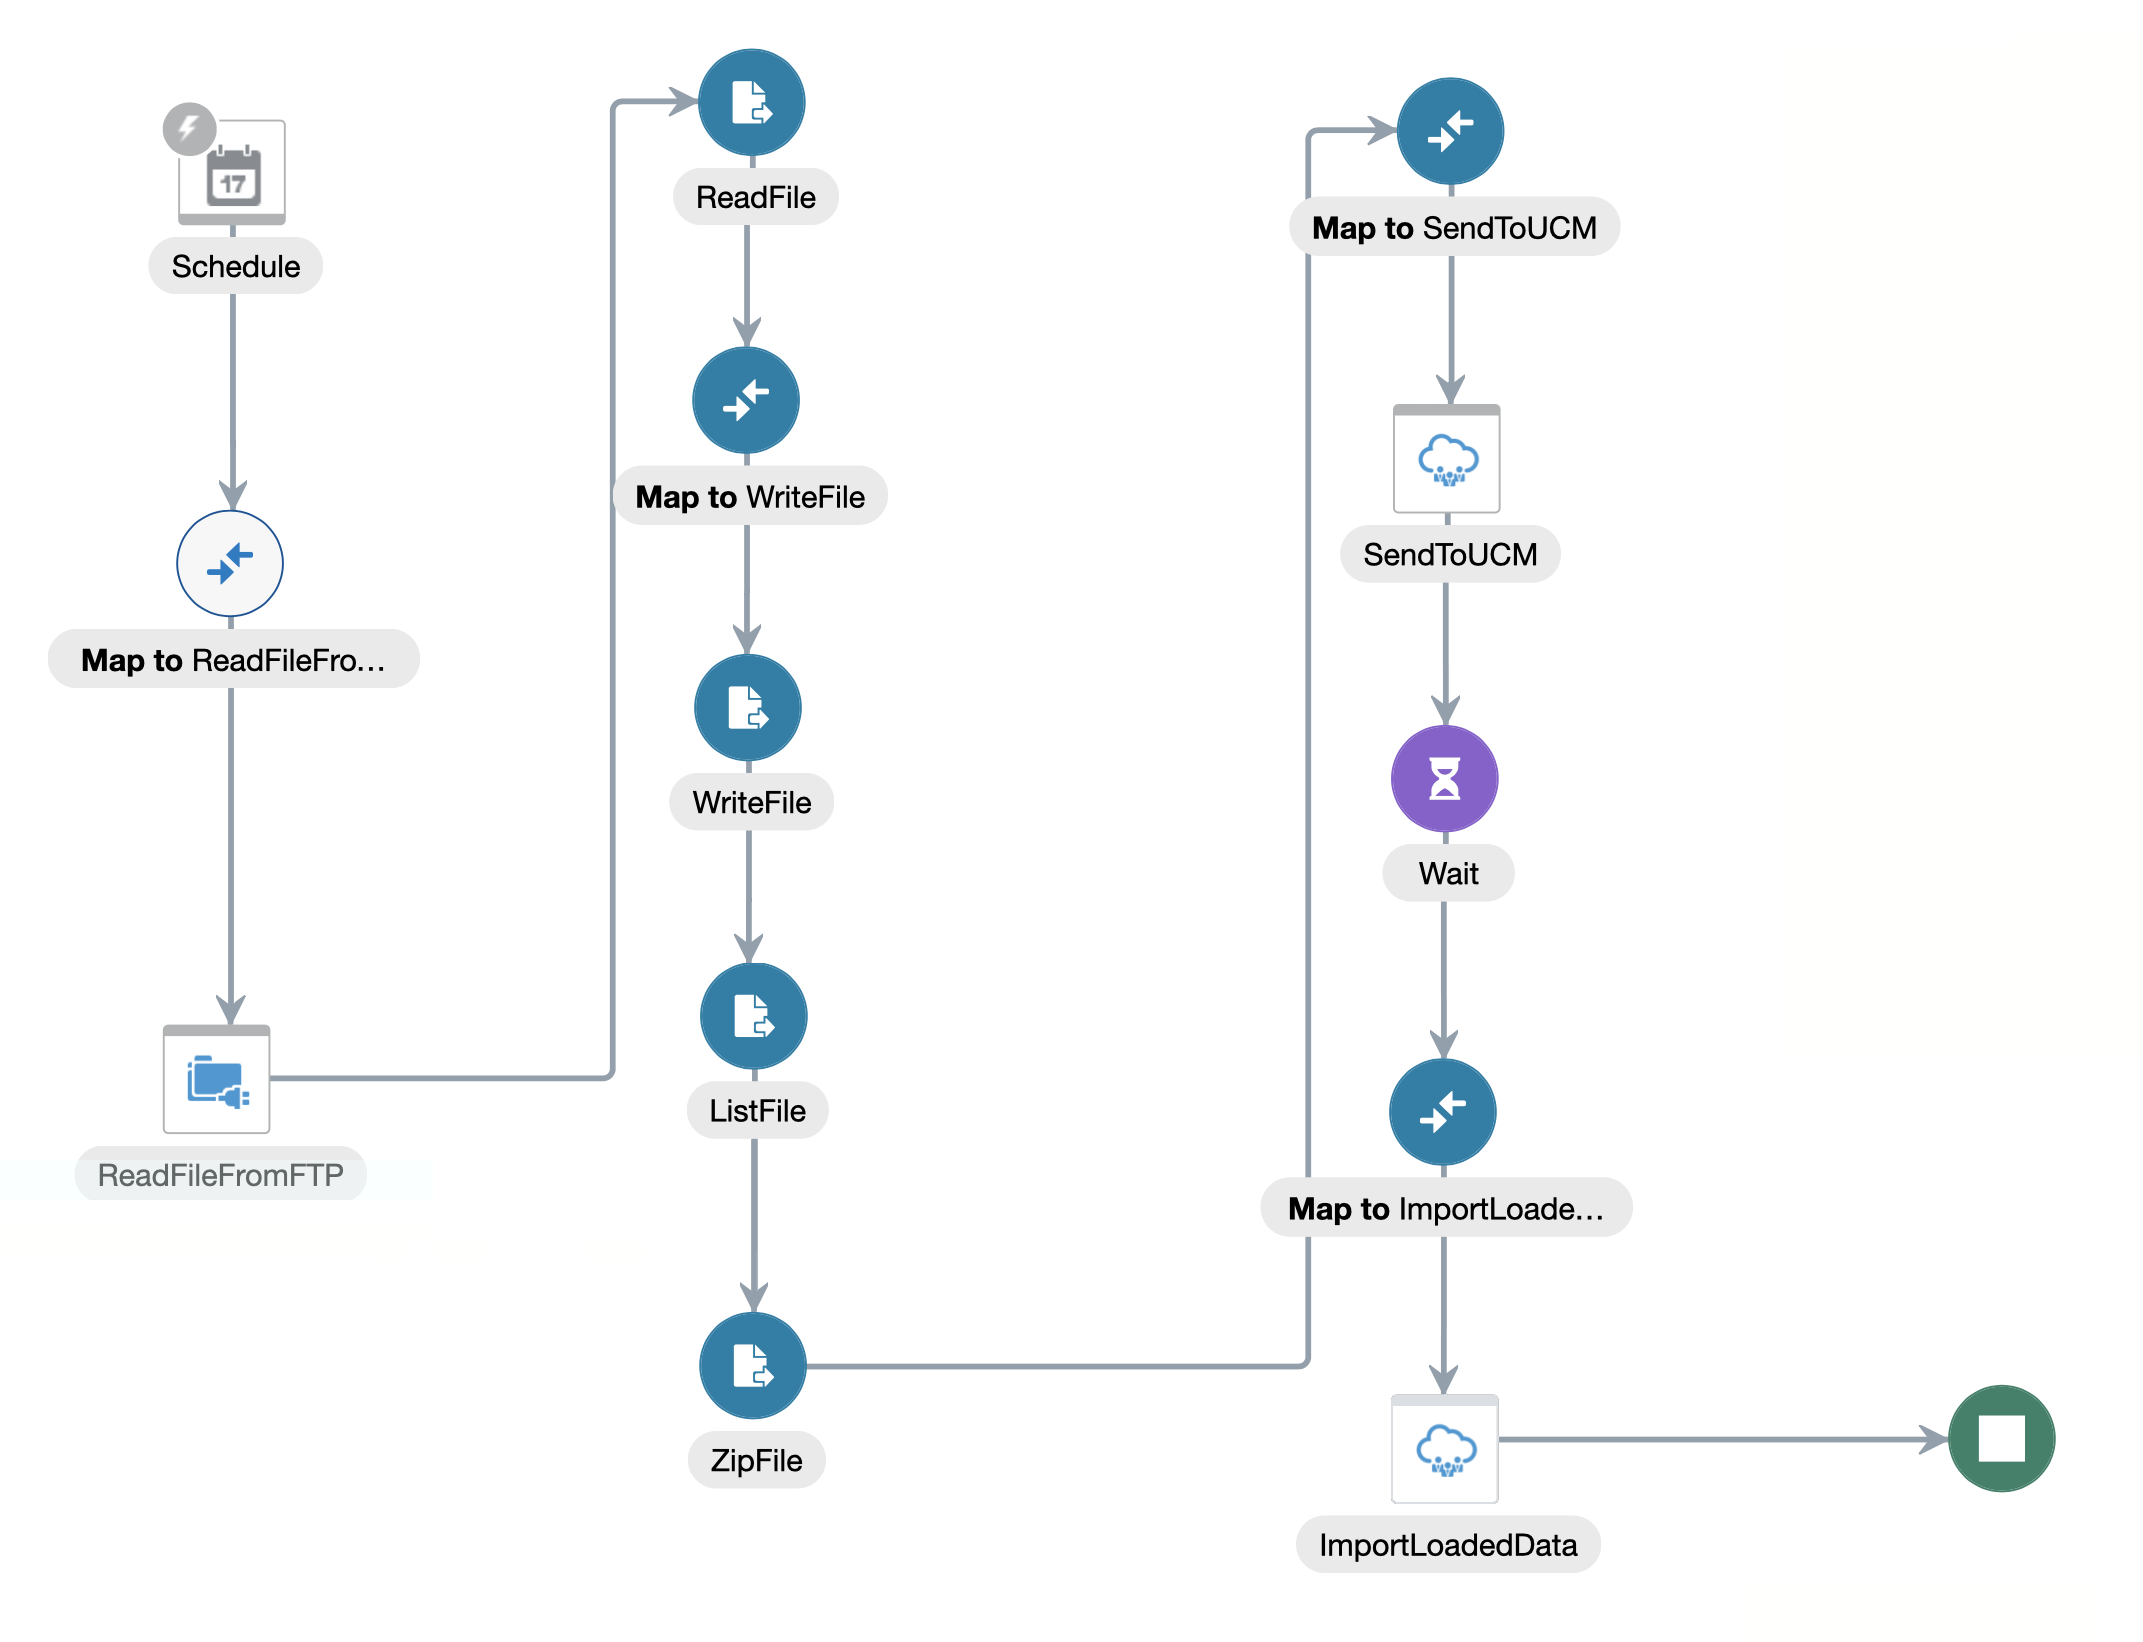
This table briefly describes the different activities in the integration. For more details, you can open the integration and click each of the activities.
| Step | Type | Description |
|---|---|---|
| Schedule | Schedule | Start of the integration. This step is read-only. |
| Map to ReadFileFromFTP | Map |
Mapts the data to read the file from the FTP server. |
| ReadFileFromFTP | FTP Adapter: Download File |
Reads the file from an FTP server. In this lab, you will edit this step to specify the FTP directory where you uploaded the file. |
| ReadFile | Stage File: Read | Reads the file retrieved from the FTP server and loads the data to a schema. This step is read-only. |
| Map to WriteFile | Map | Maps and transforms the data to generate the HCM Data Loader file. This step is read-only. |
| WriteFile | Stage File: Write Files | Write the result of the data mapping and transformation to a virtual directory in Oracle Integration. This step is read-only. |
| ListFile | Stage File: List Files | Returns a list of files that match the a file name pattern of the virtual directory in Oracle Integration. |
| ZipFile | Stage File: Zip Files | Creates a zip file that contains the |
| Map to SendToUCM | Map | Maps the UCM properties required to check in the file to UCM. |
| SendToUCM | Oracle HCM Cloud Endpoint | Checks in the file to UCM using the HCM adapter. |
| Wait | Wait | Waits for 2 minutes. |
| Map to ImportLoadData | Map | Maps the ContentID that was successfully uploaded to UCM. |
| ImportLoadData | Stop | Uploads the file to HCM Cloud using the UCM ContentId |
| Stop | Stop | The end of the integration. |
Edit the ReadFileFromFTP Activity
Download the data file.
persons.xmlUsing an FTP Client of your choice, log in to the FTP server.
-
FTP Server:
-
FTP Port:
-
Protocol:
-
FTP User Name:
- FTP Password: Your password will be provided by the instructor.
-
FTP Server:
-
If the following directory doesn't exist in the FTP server, create it:
/upload/public_ftp/ - Copy the
persons.xmlfile to the directory mentioned in the previous step. - Open Oracle Integration and edit the integration
Import Pending Worker - Select the ReadFileFromFTP activity.
Click
 .
.- Click the Operations tab.
- In the Input Directory field, enter
/upload/public_ftp/ Click Next.
The Schema page appears.
- Click Next.
Review the summary and click Done.
The FTP Adapter closes and the Update Configuration? dialog appears.
- Click Update.
Understand the Data Mapping
- Select the Map To WriteFile activity.
Click
.The Map page appears.
The Sources section shows all the fields available for mapping.
The Target section shows the
Writehierarchy.This data mapping is a representation of the
Worker.datfile.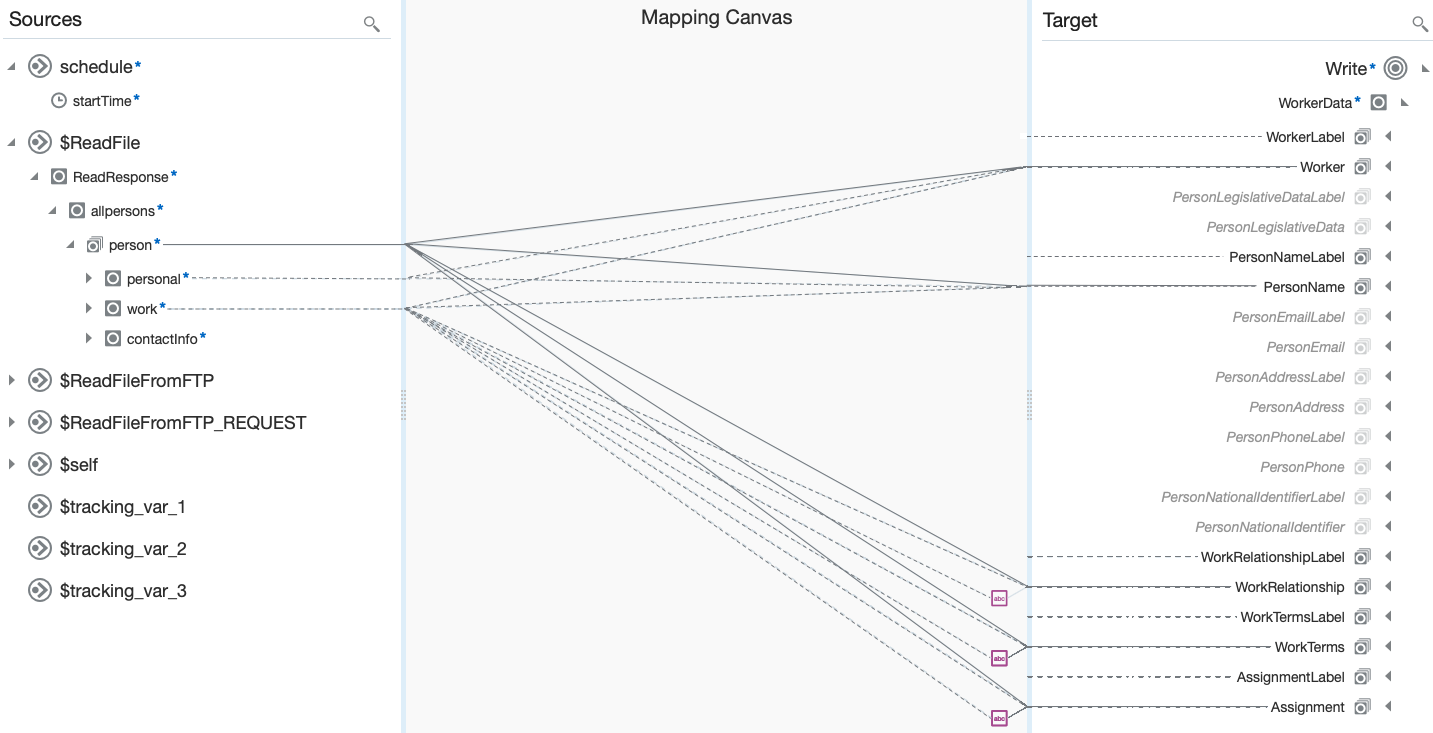
- Click Close.
Edit the Zip File Action
- Select the Zip File action.
- Click .
Click the Next.
The Configure Operation page appears.
- Click next to the Specify the File Name field.
Edit the expression to use your user number as a prefix:
'_WorkerOutput.zip'This will help you identify your file in UCM and the HCM DataLoader.
- Click Save.
- Click Exit Expression Builder.
- Click Next.
Review the summary and click Done.
The FTP Adapter closes and the Update Configuration? dialog appears.
- Click Update.
- Click Save.
Define the Tracking Fields
Tracking fields specify a unique value to monitor your integration instance.
On the Integration canvas, click
 ,
and then select Tracking.
,
and then select Tracking.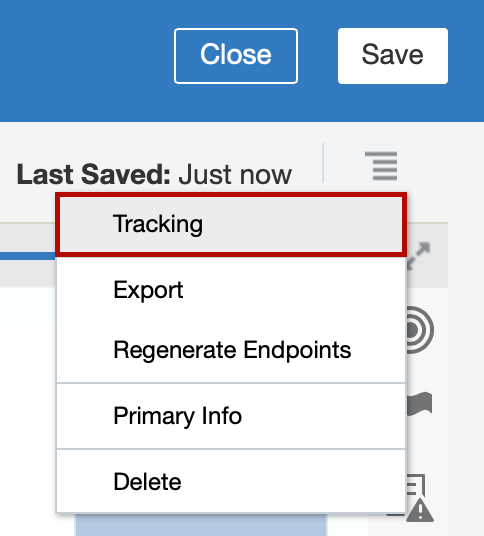
The Business Identifiers for Tracking dialog appears.
- From the Source section, select startTime, and
then click
 .
.
- Click Save.
- On the Integration canvas, click Save, and then click Close.
Activate the Integration Using REST
- Open Postman.
- Select the activate operation.
-
Edit the post URL
Replace <oic_host> with:
Replace <StudentID> with:
The resulting URL is:
/icsapis/v2/integrations/IMPORT_PENDING_WORKER_|01.00.0000 -
Configure the authorization to use Basic Auth and your Oracle Integration credentials.
Your password will be provided by the instructor. Send the request.
The response status should be
200 OK.Open Oracle Integration.
Notice that the cloned integration status is ● Active.

Run the Integration
After the status changes to active, click
 .
.
- Click Submit Now.
In the Submit Now dialog, click Submit Now.
A confirmation message with a request ID appears.

Click the request ID link in the confirmation message
The Track Runs page appears.
Wait for your integration to complete.
The wait activity is set to 2 minutes so you will have to wait at least 2 minutes.
A confirmation message indicating the integration ran successfully appears. The message contains a Run ID link.
Click the Run ID link.
The Tracking Instances page with the tracking summary for the integration appears.
Click the Start Time link.
This is the tracking field you configured earlier.

The flow for your instance appears. The flow is colored in green to indicate that it ran successfully.
Verify the File Creation in UCM
While the integration is still running you can verify the file was transferred to UCM. After the HCM Data Loader finishes importing and loading the file, it is deleted from UCM and will no longer appear in the UCM search.
Sign in to HCM Cloud using the following information:
-
HCM Cloud URL:
-
HCM Cloud User Name:
- HCM Cloud Password: Your password will be provided by the instructor.
Click the ☰ Navigation Menu icon.

- Expand Tools and then click File Import and Export.
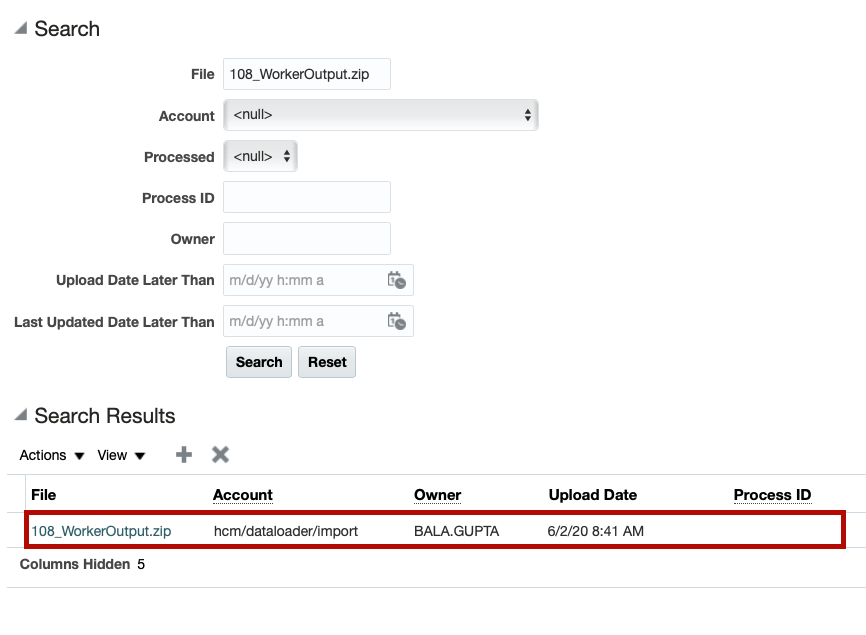
-
In the Search section, in the File field, enter
_WorkerOutput.zip Click Search.
The Search Results section shows the file you uploaded to UCM.
Verify the Data in HCM
Click the ☰ Navigation Menu icon.
- Expand My Client Groups and then click Data Exchange.
In the HCM Data Loader section, click Import and Load Data.
The Data Sets section shows the file you uploaded.
Click the ☰ Navigation Menu icon.
- Expand My Client Groups and then click Person Management.
- In the Name field enter
John Brown. Click Search.
The Search Results section shows the data for John Brown. This confirms that the data was imported to your HCM instance.
Congratulations! You've configured and run an integration to retrieve a file, transform it, and import pending workers to HCM Data Loader. You've also used the Oracle Integration REST API to clone an existing integration and activate it.
