
Before You Begin
Some steps in this tutorial have a  icon next to them. Click this
icon to copy the snippet of text to your clipboard and then paste where needed.
icon next to them. Click this
icon to copy the snippet of text to your clipboard and then paste where needed.
Your instructor will provide you the information you need to access the environments used in this lab.
For this lab we will provide you the following:
- Oracle Integration
- Engagement Cloud
Get Your Oracle Integration (OIC) Environment
Select your OIC Environment and enter your User Number to get the information needed to access Oracle Integration.
- OIC URL:
- OIC User Name:
- OIC Password: Your password will be provided by the instructor.
Sign In
-
Open your Oracle Integration instance.
Enter your user name and password.
Your password will be provided by the instructor.Click Sign In.
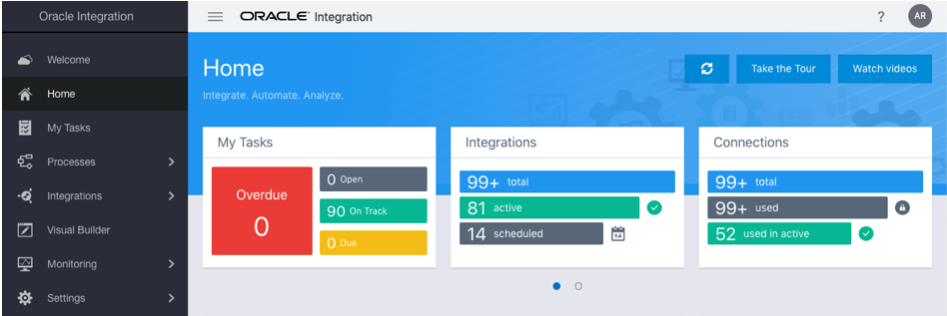
The Home page appears.
You are now logged in and ready to use Oracle Integration.
Create the Update Bill Lines Integration
We'll create an integration to update the Bill Lines for a Subscription Product in Oracle Engagement Cloud.
-
The Navigation menu provides access to the core capabilities within Oracle Integration such as Integration, Process Automation, Insight, B2B, and Visual Builder. We will explore some of these later.
On the Home page, click Integrations, and then click Integrations.
-
The Integration page lists the integrations in your environment. These integrations can be in different stages of the development cycle. You can check the status column to see if an integration is activated (● Active) or under construction (● Configured).
The first step in creating an integration is to create a Connection. Connections define the attributes, such as the hostname and security policies, used to connect to a specific type of application or technology.
We have already created an Oracle Engagement Cloud connection for your use in this lab.
On the Integrations page, click Create.
-
In the Select Integration Style dialog, select App Driven Orchestration.
This style lets you run integrations on demand as opposed to Scheduled Orchestrations that are batch driven and run on a defined schedule. We also support other patterns such as publish and subscribe that let you distribute events to multiple integrations.
- Click Select.
- In the Create New Integration dialog, configure the integration:
What do you want to call your integration?
Enter
Update Bill Lines-
In the What does this integration do? field, enter:
This integration will update the Subscription Product Bill Lines.
The Identifier uniquely identifies your integration and is automatically generated from the name you entered. Since you are working on a shared environment, it is important to use the name assigned to you so you can easily find your integration and avoid conflicting with others who are also working on this lab.
-
Click Create.
The Integration canvas appears.
Create the Update Bill Lines Trigger
Triggers define how your integration is exposed to to be invoked. In this case, we will define a trigger to expose your integration as a REST API.
- Hover over START and click
 .
. - Begin typing
REST Interfacein the Search field to find the connection that exposes your integration as a REST API. -
Select the connection named
REST Interface.The Configure REST Endpoint wizard appears.
- Name your endpoint
UpdateBillLines. -
In the What does this endpoint do? field, enter:
This endpoint defines a REST interface to update the Bill Lines within a Subscription Product. - Click Next.
- On the Resource Configuration page, configure the following properties:
-
What is the endpoint's relative resource URI:
/subscriptionProducts/billLines/{SubscriptionProductPuid}
The relative URI is combined with the integration environment hostname and integration identifier to define the full REST API endpoint.
The parts of the URI enclosed with curly braces are template parameters that will be supplied when the integration is called.
- What action do you want to perform on the endpoint?: select PATCH.
- Select Configure a request payload for this endpoint.
- Select Configure this endpoint to receive the response.
-
- Click Next.
-
On the Request Parameters page, leave the default values, and click Next.
If you needed to specify additional query parameters, you would define them here.
- On the Request page, configure the following values:
-
From the request payload format list, select JSON Sample.
The JSON schema used by an integration can automatically be generated with a sample JSON payload.
- Click the <<<inline>>> link.
- Enter the following JSON sample:
{
	"BillLines" : [
		{
			"BillLinePUID" : "string",
			"UsageQuantity" : 0
		}
	]
}
This payload specifies a collection of Bill Lines to be updated, each with a BillLinePUID and UsageQuantity element.
-
Click OK.
The JSON sample will be validated and a JSON schema will be generated.
- Click Next.
-
- On the Response page, configure the following values:
- From the response payload format list, select JSON Sample.
- Click the <<<inline>>> link.
- Enter the following JSON sample:
{
	"BillLines" : [
		{
			"BillLinePUID" : "string",
			"UsageQuantity" : 0
		}
	]
}
This integration will be defined to simply return the request payload.
- Click OK.
- Click Next.
On the Summary page, expand the Endpoint Summary to view the trigger for your integration. Check that everything looks right.
click Done.
The canvas with the new trigger appears.
-
On the Integration canvas, from the Layout list, select Horizontal.

- Click Save to save the integration.
Iterate Over Billing Lines
We defined our REST Interface trigger to accept a collection of Bill Lines to update. Oracle Engagement Cloud only provides an API to update a single Bill Line at a time. So we need to loop through the collection of Bill Lines passed to our integration and invoke the Engagement Cloud API for each.
We'll add a For Each construct to loop through our Bill Lines.
On the canvas, hover over the line coming out of our UpdateBillLines trigger, and click
.In the Search field, enter
For Each.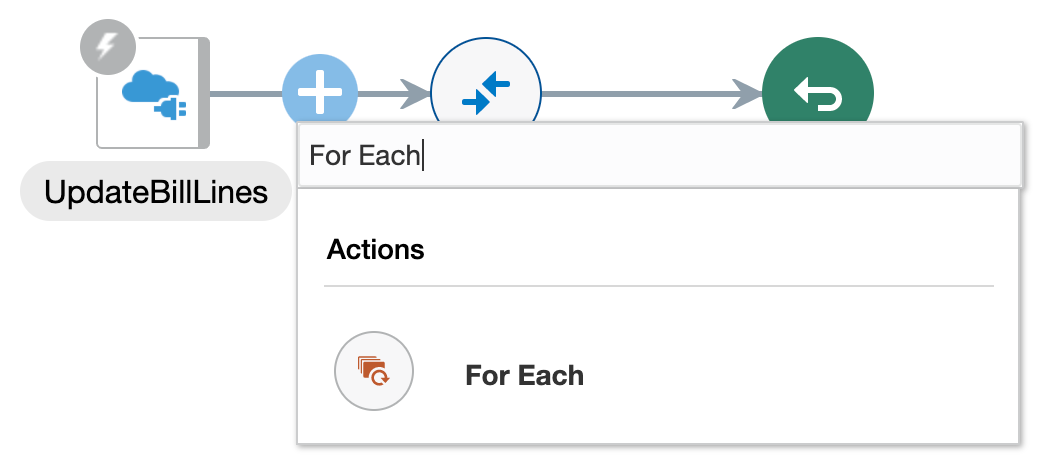
From the Actions section, select For Each.
The Create Action dialog appears.
- In the Name field, enter
ForEachBillLine. - Drag the BillLines element from the Source tree, and drop it on the Repeating Element field.
-
In the Current Element Name field, enter
CurrentBillLine.
-
Click Create.
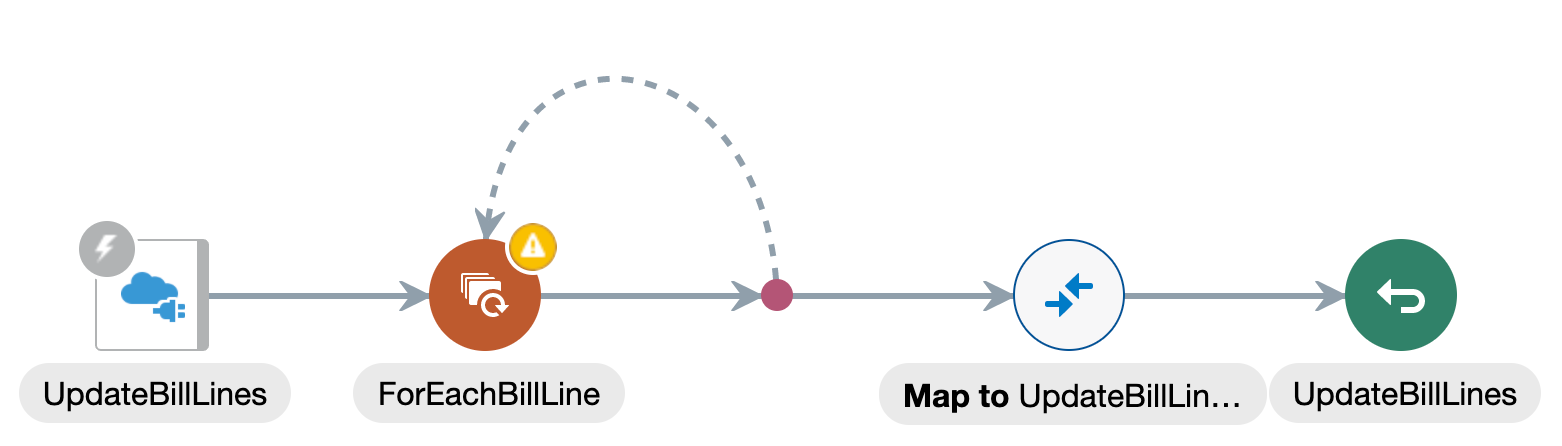
The canvas now displays a loop.
- Click Save to save the integration.
Update the Bill Line Quantity
Next we will add an activity inside our For Each loop to update each Bill Line in Oracle Engagement Cloud.
- Hover over the line coming out of the ForEachBillLine action and click .
- In the Search field, enter
Engagement Cloudto find our Engagement Cloud connection. From the Invokes section, select Engagement Cloud.
The Configure Oracle Engagement Cloud Endpoint dialog appears.
Connections created with our application adapters simplyfy the task of discovering and configuring access to application business objects and events.
- Name the endpoint
UpdateBillLine. - Click Next.
-
On the Operations page, configure the following:
- From the Browse by list, select Business (REST) Resources.
- From the Select a Service Application list, select crmRestApp.
- From the Select a Business Resource list, search for and select SubscriptionProducts.
- Click Browse and configure a child resource.
- From the Child Resources list, select SubscriptionProducts : billLines.
- From the Select the operation to perform list, select update.
- Click Ok.
-
Click Next.
A summary of the properties you configured appears.
-
Review the summary and click Done.
That's all it takes to configured an action that will update a Bill Line.
- Click Save to save the integration.

Add Request Mapping
Next we need to map the data sent to our integration to the activity we just created to update a Bill Line in Engagement Cloud. In this case, we want to map the current Bill Line in our For Each loop.
Click Map to UpdateBillLine, and then click
 .
.The Map to UpdateBillLine page appears.
Notice a tooltip indicates available recommendations for this data mapping.
Click
 Recommendations.
Click ✓ Apply Recommendations.
A Confirmation message appears informing you that the recommended mappings were applied.
Verify the following mappings and correct if necessary:
- TemplateParameters.SubscriptionProductPuid ⟶ TemplateParameters.id0
- CurrentBillLine.BillLines.BillLinePUID ⟶ TemplateParameters.id1
- CurrentBillLine.BillLines.UsageQuantity ⟶ billLines.UsageQuantity
Ensure you are not mapping data from the
request-wrapperas this represents the collection of Bill Lines sent to your integration and you are updating only a single Bill Line for the current for loop iteration as defined in$CurrentBillLine.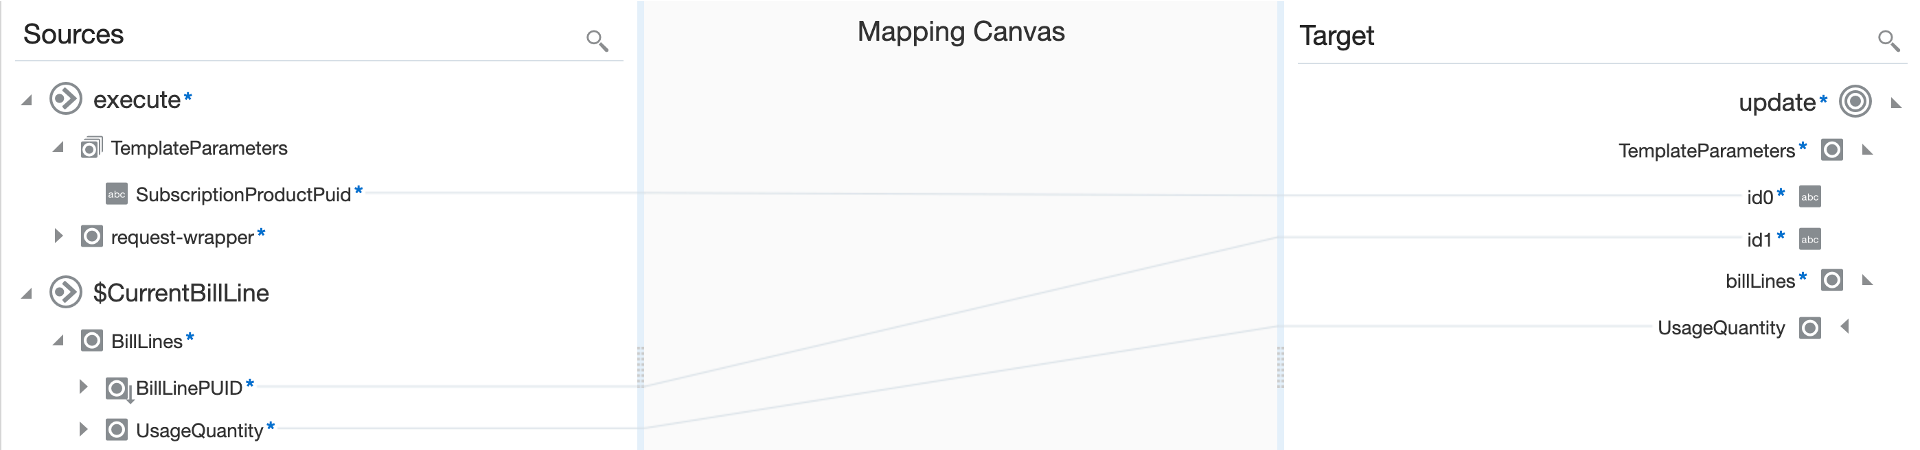
-
Optionally, you can also map data manually by dragging the data elements from the Source tree, and dropping them on the Target tree.
Click Validate and then click Close.
The Integration canvas appears.
- Click Save to save the integration.
Add Response Mapping
Most integrations will need to return a response to the caller. This integration will be simply return the request payload.
We'll use the UpdateBillLines map to populate the response data.
Click Map to UpdateBillLines, and then click
.The Map to UpdateBillLines page appears.
Notice a tooltip indicates available recommendations for this data mapping.
Click
Recommendations.Click ✓ Apply Recommendations.
A Confirmation message appears informing you that the recommended mappings were applied.
-
Optionally, can also map data manually by dragging the data elements from the Source tree, and dropping them on the Target tree.
Verify the following mappings:
- request-wrapper.BillLines ⟶ response-wrapper.BillLines
- request-wrapper.BillLines.BillLinePUID ⟶ response-wrapper.BillLines.BillLinePUID
- request-wrapper.BillLines.UsageQuantity ⟶ response-wrapper.BillLines.UsageQuantity

Click Validate and then click Close.
The Integration canvas appears.
- Click Save to save the integration.
Add Tracking Fields
Tracking fields let you identify and find specific integration instances. A tracking field associates an integration instance with a business identifier. You must define at least one tracking field per integration.
For example, for an integration that processes orders, you can track the integration by an order number. If for some reason the order is missing or delayed, you can search by the order number to locate the order and find out what caused the issue.
In the Integration canvas, click the error icon
 next to the Last Saved field.
Hover over the error to see the detailed error description. In this case, the error should indicate that you need to define a primary business identifier for tracking.
- Click
 next to the Last Saved field.
 - Select Tracking.
- In the Source tree, expand the execute node, and then expand the TemplateParameters node.
Drag the SubscriptionProductPuid to the first row of the Tracking Fields table.
The first field in the list is the primary tracking field. It's used as the primary index to find an integration instance.
Click Save.
The Integration canvas appears. Notice that there are no errors.
Click Save to save the integration.
- Click Close.
Activate the Integration
We finished building our integration. Before using it, we need to activate it.
-
On the Integrations page, locate your integration and hover over it.
The name of your integration is
Update Bill Lines.When you hover over the integration, a set of actions appear in the Status column.
Click
 to activate your integration.
In the Activate Integration dialog select Enable Tracing, and then select Include Payload.
Select Enable Tracing to keep a record of all the steps the integration performed.
When you select the Include Payload option, the message payloads are also stored.
We strongly suggest that you don't enable this option in production environments. Including the payload in the tracing will affect the performance of your system, and may violate your company's data retention rules by storing sensitive information in the payload trace.
Click Activate.
A confirmation message informing you that the activation is in progress briefly appears. Then your integration status will change to Action in progress.
Click
 to refresh the status.
The activation process is asynchronous so you'll need to refresh the Integrations page to monitor the activation status.
When the status changes to ● Active, the integration is ready to run.
Test the Integration
Now let's see if our integration works. We'll use the test feature to call the integration from the development console.
-
On the Integrations page, locate your integration and hover over it.
The name of your integration is
Update Bill Lines. - Click
 and select Test.
 On the Test page, configure the following URI Parameters:
- SubscriptionProductPuid:
3021-PRDT-2005
These are the template parameters that you specified in the relative endpoint URI that triggers the integration.
- SubscriptionProductPuid:
- Click the Body tab.
- Enter the following JSON:
{
  "BillLines" : [
    {
      "BillLinePUID" : "3021-PRDT-2005-BILL-2242",
      "UsageQuantity" : "5"
    }
  ]
}
Click Test.
A confirmation message informing you that the request was submitted appears.
- Expand the Response section to verify that you got a successful response and verify the Status is 200 OK.
-
Click the Instance Id link.
The integration Tracking page appears. This page shows an outline of the integration you just tested. Note the counter over the ForEachBillLine activity indicating this loop was executed 1 time since your payload only had a single Bill Line.

View Tracking Information
The Activity Stream shows us each activity that was executed during our integration as well as any messages and payloads exchanged.
Click
and select View Activity Stream.The Activity Stream pane displays the list of activities.
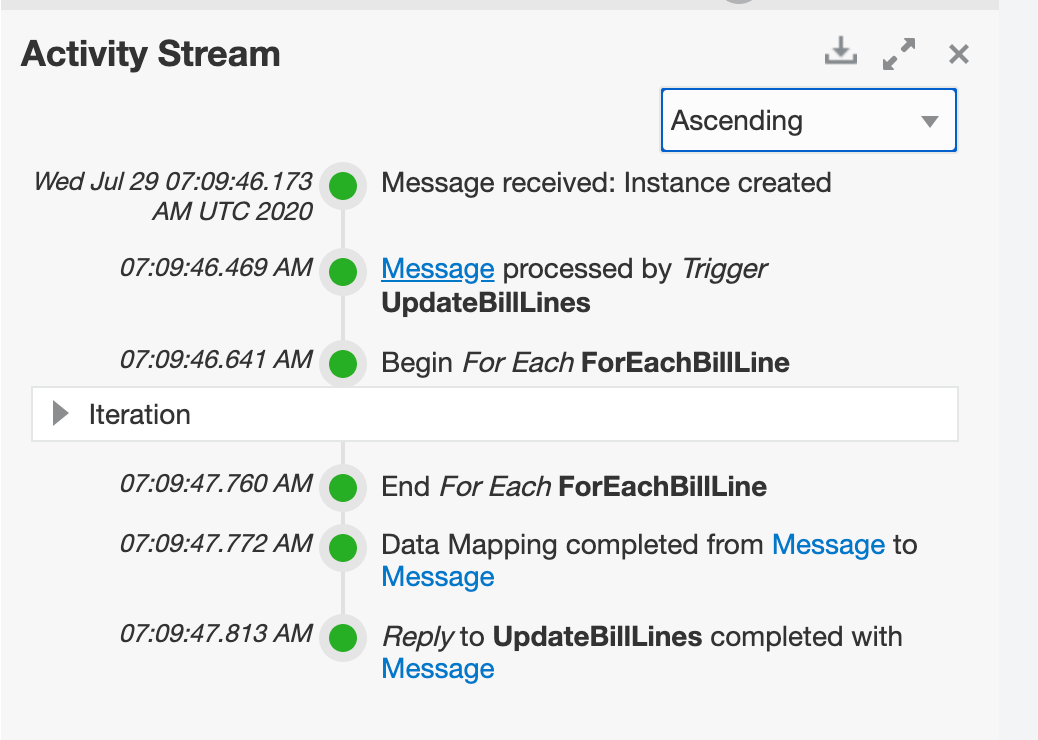
- Click Message or Payload to view the payload data for a specific activity.
Congratulations!
Congratulations! You have completed your integration.
